Pump it up when you don't really need it.
Elvis Costello
At the end of last season I discovered two of the four electric pumps on board BIANKA did not work. They both were feed from the same circuit breaker but, do not operate at the same time. One was the Wash Down pump used to clean the anchor chain after it's been laying on mucky bottoms. The other was the Macerator pump that is used usually once a year on haul out after I rinse out the holding tank. Neither one would power up. Sounded to me like a power issue since both pumps were fed from the same circuit. Having two pumps fail at the same time seemed against the odds. Sounded to to be an easy fix. Most likely a power issue. First I measured the voltage from the circuit breaker panel it read the nominal 12 volts. Well, then gotta be the switch that switches between which of the pumps will be energized. But, when I checked the switch it was good. Oh well. Looks like both pumps did fail at the same time. Since one pump was for the wash down and used every time I hoist the anchor and the other pump was for the macerator and really only used one time each year when cleaning and winterizing the holding tank for storage. I decide the wash down pump was the priority.
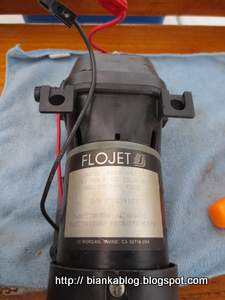
The wash down pump is a Flojet 4300 series pump. A 4305-143 to be precise and had been on the boat since I bought her in 1995. It had worked well until now. The pump is located in behind a panel the head area along with the pressure water pump and the shower sump pump:

Pretty easy to get to unlike the macerator pump which is buried under some cabinetry and hoses. Though because all the wiring was connected with crimped splices I had to cut the wires to remove the pump from the cabinet. But, I decided to rewire the pump with Anderson Powerpole connectors to make future removal of the pump and trouble shooting easier.
After removing the pump I looked for anything obvious that might have caused the failure:
Not seeing anything suspicious I followed red 12 volt lead that went into a small module on the pump and exited out the other side and connected to the motor. The is the pressure switch that shuts off the pump when the pressure reaches a certain level. Taking the cover off of this module exposed it's connections:

The wash down pump is a Flojet 4300 series pump. A 4305-143 to be precise and had been on the boat since I bought her in 1995. It had worked well until now. The pump is located in behind a panel the head area along with the pressure water pump and the shower sump pump:
Pretty easy to get to unlike the macerator pump which is buried under some cabinetry and hoses. Though because all the wiring was connected with crimped splices I had to cut the wires to remove the pump from the cabinet. But, I decided to rewire the pump with Anderson Powerpole connectors to make future removal of the pump and trouble shooting easier.
After removing the pump I looked for anything obvious that might have caused the failure:
Not seeing anything suspicious I followed red 12 volt lead that went into a small module on the pump and exited out the other side and connected to the motor. The is the pressure switch that shuts off the pump when the pressure reaches a certain level. Taking the cover off of this module exposed it's connections:
Nothing unusual but, I did notice a little melting and discoloration of the wire and some melting on the housing of the switch:

Well this certainly was worth investigating. The connections to the wires looked good but, when I took out my meter and measured across them I found a high resistance across the leads:

I measured 4 meg ohms not a totally open circuit but, high enough to prevent the pump from operating. I decided to first remove the spade connectors clean the contacts to see if that improved the readings:

Having done that I still measured a high resistance. So I decided to remove the pressure switch module from the body of the pump:

I had no parts diagram of this part of the pump so I could not be sure how things were supposed to look. But, when I went back and measured across the leads of the pressure switch I read about three ohms so that seemed to be normal. I put the pressure switch module back on to the pump and reinstalled the pump back into the locker. After connecting the wash down hose I applied power and the pump began gushing out water. Ah, fixed I thought. I shut down the power put a nozzle onto the hose and fired up the pump again. I could hear the pump as it pressurized the hose and then shutdown like it should. But after opening the nozzle and relieving the pressure the pump still failed to turn on. So it looks like I'll need to do a little more troubleshooting but, before I do I will get a replacement pressure switch. Since that looks like where the problem is. Though the documentation shows there is not such part. It looks like I may need to order a whole upper housing. I'll be making a call into FloJet customer service to see if this is the case before I continue.


.jpg)


.jpg)


2 comments:
Thiis was a lovely blog post
I love this quote about finding joy in unexpected moments.
Post a Comment