I've got a few more things I'll need to order for the up coming season but, they can wait until I get closer to a launch date. For now these along with 9 yards of Sunbrella fabric for the new Sail Cover will keep me busy enough.
Showing posts with label varnish. Show all posts
Thursday, March 31, 2016
SPRINGING FORWARD AND GETTING OUT OF THE DOLDRUMS
I've been in sort of a boat doldrums for a few weeks now. I've not had much urgency to get down to the boat since my Electric Propulsion system does not require a whole lot of maintenance. I've instead been spending some time spring cleaning around the house and trying to figure out what to with some of the left over stuff I pulled off the boat when converting to Electric Propulsion. Thinking about EBAY, donating or selling out right. I've been cleaning out a lot of stuff in the Den where I'll be hopefully working on a new sail cover and cushions for the Engel refrigerators in the main cabin. Now that Spring has officially arrived I feel the boat calling again. So I ordered a few items I know I'll be needing for the upcoming season.

I pretty much am a single hand sailor these days. One thing I bought since it really makes a lot of sense for me to use is a Pick Up Buoy. I don't know why it has taken me so long to buy one. I was getting along quite well with an empty milk container tied to the mooring pennant lines and a boat hook since 1996. But, after watching a neighboring sailboat use his it just makes a lot of sense for me. Especially since the winds and the currents in the harbor do not always cooperate sometimes requiring me to sometimes make another pass to snag the line.

Another item I knew I'll be needing in the up coming weeks is some Cetol Marine Natural Teak Wood Finish. I've been using Cetol for years mostly on the cockpit hatches, bright.work and handrails. Last spring I decided to use it to spruce up the galley area, companionway steps and the headliner project . I was pleased with the look and ease of application. So I'm planning on using it on other areas of the cabin this year. I bought two quarts since I also plan to use it on some unpainted molding at the house.
I've got a few more things I'll need to order for the up coming season but, they can wait until I get closer to a launch date. For now these along with 9 yards of Sunbrella fabric for the new Sail Cover will keep me busy enough.
Saturday, June 06, 2015
USEFUL TOOLS: PAINTERS POINTS
Because of the cold water temperatures I've been putting off the launching of BIANKA this year. So I've been doing a lot of maintenance items like varnishing and touching up some of the wood trim on board. Much easier when the boat is on solid ground anyway. Because one normally can only put varnish or paint on one side of an item it takes two days to do both sides of say a wood trimmed screen hatch. But, one can also speed things up and do a coat a day if one uses Painters Points
.


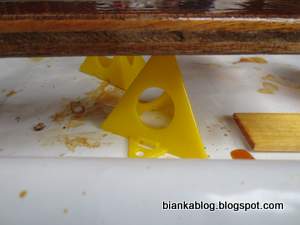
These neat little plastic pieces allow you to not only raise an item you need to paint off the surface so you can paint all the way to the bottom without it sticking to what's underneath it. But, you can also do one side a flat piece and then using the points to support the piece put a coat on the other side of the item. This allows you to put a coat on the whole piece in one day. The Painters Points can hold up to 200 lbs. I don't have anything nearly that heavy that I will be varnishing on board. But, even the small items I do have to maintain are done much faster without waiting an extra day for one side to dry. They also stack nicely for storage and don't take up a lot of room when not in use. Which is important on a boat. They came in very useful in varnishing the forward overhead screen hatch:
The points can be arranged to best support the item you are painting or varnishing:
I also used them when putting fresh coats of Cetol
on the boarding ladder steps:
In short if you do a lot of refinishing on board these Painters Points come in very handy and can help speed up your projects.
.
These neat little plastic pieces allow you to not only raise an item you need to paint off the surface so you can paint all the way to the bottom without it sticking to what's underneath it. But, you can also do one side a flat piece and then using the points to support the piece put a coat on the other side of the item. This allows you to put a coat on the whole piece in one day. The Painters Points can hold up to 200 lbs. I don't have anything nearly that heavy that I will be varnishing on board. But, even the small items I do have to maintain are done much faster without waiting an extra day for one side to dry. They also stack nicely for storage and don't take up a lot of room when not in use. Which is important on a boat. They came in very useful in varnishing the forward overhead screen hatch:
The points can be arranged to best support the item you are painting or varnishing:
I also used them when putting fresh coats of Cetol
In short if you do a lot of refinishing on board these Painters Points come in very handy and can help speed up your projects.
.
Labels:
boat maintenance,
brightwork,
cetol,
maintenance,
painters points,
PAINTING,
tools,
varnish,
varnishing
Tuesday, May 08, 2012
USEFUL THINGS: Cardboard boxes
One of my projects this year is to re varnish Bianka's cockpit table. I'm applying three coats of West System epoxy first followed by three coats of varnish. Applying the epoxy was not a problem for flat pieces of the table. But, the fold down end pieces were unstable when standing on their edges. What to do? I found the answer in a cardboard box I had laying around:
The box held them securely so I was able to apply the epoxy to the edges. Plus I was able to move and position both pieces at once. Sometimes simple solutions to problems are all around you if you just look.
I cut two slits into it with a box cutter and put the edges of the side table pieces into them:
Labels:
cardboard,
epoxy,
projects,
SPRING OUTFITTING,
table,
useful stuff,
varnish
Friday, April 06, 2012
STRIPPING VARNISH
Well, the off season projects are starting to back up. One project I've put near the top of the list is to re-varnish the boats cockpit table.
It's been over ten years since I last varnished the folding cockpit table on BIANKA. The eight or nine coats I put on at the time have held up pretty good. But, sun and weather have finally taken their toll on some parts of it.
So it's time to strip it down and re varnish it. Like painting most of the work is in the preparation. A small folding table for a boat is no exception. After removing it from the boat one needs to remove all the hardware and screws:
It's been over ten years since I last varnished the folding cockpit table on BIANKA. The eight or nine coats I put on at the time have held up pretty good. But, sun and weather have finally taken their toll on some parts of it.
So it's time to strip it down and re varnish it. Like painting most of the work is in the preparation. A small folding table for a boat is no exception. After removing it from the boat one needs to remove all the hardware and screws:
Once the hardware has been removed it's time to strip off the old varnish. There are a number of ways to do this. You can use various liquid varnish strippers
. I found it is faster and easier just using a hand scraper and a heat gun:
Here is a video of how quick and easy this method really is:
Once you get started the stripping goes very fast and there is no drying time like with the chemical strippers. I had the whole table stripped in about a half hour.
Subscribe to:
Posts (Atom)