
Showing posts with label LIGHTS. Show all posts
Showing posts with label LIGHTS. Show all posts
Wednesday, March 29, 2017
SOMETHING NEW IN CASE OF EMERGENCY: Weems and Plath SOS Distress Light
Tuesday, June 02, 2015
ANOTHER IMPROVEMENT IN ENERGY SAVINGS

When I first bough BIANKA in the fall of 1995 she had two clip on lamp fixtures each with a 60 watt incandescent bulbs. I used them for the cabin illumination when I was tied up to the dock as they used 120 volts AC. They worked well as long as you did not drop them when they were on as the hot filaments were very fragile. I replaced them a number of times. Then a few years ago along came compact florescent lights. They only used about 16 watts for the same amount of light as the delicate 60 watt incandescent they replaced. They were not as susceptible to damage but, I still did manage to break one in the cabin when it fell. Since these lamps also contain mercury it is a good idea to clean it up ASAP. This spring in order to avoid another accidental mercury spill this spring I bought some new TCP LED 60 Watt Equivalent Light Bulbs
Sunday, August 04, 2013
UNDER THE BINNACLE:Wiring Update!
I needed to remove the old shift cable for the old diesel engine. I left it in place when I converted to electric propulsion because I thought I might use it to control some type of electronic switch down the road. But, after six years I realized I probably would never use it. So it was time for it to go. I also had other projects planned to mount on the binnacle and the shift lever would just be getting in the way.
To get access for it's removal I had to remove the compass from the binnacle:

When I did I broke one of the wire connections to the LED light on the compass housing which provides illumination of the compass at night:

Not a big deal and easy enough to repair. But, then I thought this would be a good time to upgrade the connectors to Anderson Powerpoles . So that's what I did. First the wires supplying power the binnacle:

Then added matching connectors to the wires that led to the LED compass light:
The Powerpole connectors will make it easier to disconnect things in the future and also offer a little more insulation and protection from shorts than the original spade lug connections.
To get access for it's removal I had to remove the compass from the binnacle:
When I did I broke one of the wire connections to the LED light on the compass housing which provides illumination of the compass at night:
Not a big deal and easy enough to repair. But, then I thought this would be a good time to upgrade the connectors to Anderson Powerpoles . So that's what I did. First the wires supplying power the binnacle:
Then added matching connectors to the wires that led to the LED compass light:
The Powerpole connectors will make it easier to disconnect things in the future and also offer a little more insulation and protection from shorts than the original spade lug connections.
Saturday, July 13, 2013
REWIRING THE HEAD LIGHT: PART TWO
Tweet

Now that I had rewired the house wiring that connected to the light fixture with Anderson Powerpole connectors. It was time to rewire the fixture it's self. I soldered some wires to the connections for the switch and put Anderson Powerpole connectors on the other end of theses wires. I also soldered some wires onto the LED light being careful not to use too much heat while doing so to avoid any damage to the electronics of the light disk. NOTE: The LED light I used is not polarity sensitive so it did not matter which lead I made positive or negative. You need to check the wiring specs of the specific LED you may use as this is not always the case.
At the other end of these wires I put on the appropriate colored Anderson Powerpole connectors.
Once all the connectors were on the proper wires. I used cables ties to make things secure, reinstalled the fixture into the head area and connected it to the house wiring:
I put some white electrical tape behind the LED just to make sure it would not short out to the light frame. Using the Anderson Powerpole connectors will allow for the easy addition of more LED lights or changes and modifications in the future. For example one thing I might add in the future is a red LED light for nightlight use and to prevent loss of night vision when sailing at night. Only thing remaining is to put the cover back on the fixture frame and this project is done for now:
Wednesday, July 10, 2013
REWIRING THE HEAD LIGHT: PART ONE
Tweet
When I bought BIANKA she had a combination of lights. Some were fluorescent and some were regular tungsten lamps. Which are power hogs compared to the florescent lights. I've been replacing the tungsten lamps with much more energy efficient LED lamps. I also am replacing the fluorescent fixtures with LEDs as they fail instead of getting them rebuilt. The fluorescent fixture in the head area died a while ago and the other day I decided to rewire it for an LED replacement:


When I bought BIANKA she had a combination of lights. Some were fluorescent and some were regular tungsten lamps. Which are power hogs compared to the florescent lights. I've been replacing the tungsten lamps with much more energy efficient LED lamps. I also am replacing the fluorescent fixtures with LEDs as they fail instead of getting them rebuilt. The fluorescent fixture in the head area died a while ago and the other day I decided to rewire it for an LED replacement:
After making sure the breaker was turned off I first removed the bulbs and then the metal shield that covered the ballast electronics::
I was then able to cut the power wires to the fixture and remove the four screws holding the fixture to the cabin top. There were two wood shim pieces on the back of the light to take in account the curvature of the cabin top. I am going to reuse the fluorescent fixture and it's switch but, I have no use for the failed ballast circuit board so I will remove it and a lot of the associated wiring:
To remove the ballast board I had to drill out the two rivets holding the circuit board to the light frame from the back of the fixture:
With the circuit board gone there is a lot more room to install the LED replacement lamp(s):
Turning back to the light wiring. I noticed that someone had used wire nuts to attach the light to the boat wiring:
This is not a good idea for a whole bunch of reason on board a boat, Especially from a corrosion standpoint. I removed the wire nuts and replaced them with versatile Anderson Powerpole Connectors  :
:
This will make it east to reconnect the new LED lights when the fixture is installed. It will also allow for easier modification and changes in the future.
Friday, November 16, 2012
WATTS GOING DOWN ON LAND AND SEA
I have mentioned that those of accustomed to living on boats may have an easier time than those who are only living on land after storms like Hurricane Sandy. That's because cruising on a boat like BIANKA involves getting away from land as much as possible. My boat is usually on a mooring or anchored off in some picturesque spot that pleases me. Very rarely will I tie up to a marina's dock. So one is well aware of how much power one can use and where it comes from. We sailors know it is not seemingly unlimited and always available at the flick of a switch. Millions of people who reside on land including the residents of lower Manhattan had a "reality bites" experience after Hurricane Sandy blew through the area. They might learn a thing or two from sailors like myself who have taken some of the technology that worked so well on board our boats and have transferred it sucessfully to land based structures. You can save quite a bit of power (watts), money and have an automatic emergency back up system to illuminate the rooms in your house at the same time. Like my whole house LED lighting system:

I have converted many of the lights on board BIANKA to energy efficient LED's from the masthead anchor light to the ones over the galley and cabin. They worked so well in the boat I wondered how they would do in the house. So I went about building a simple system that would meet my needs. It's easy to do with off the shelf components the heart of which is a Morningstar SL-10L-12V SunLight 10 Amp Charge Controller LVD .
.


 It also has a buck regulator that keeps current regulated so that the LED junctions do not overheat and fail due to voltage or current fluctuations in the wiring. It's something you should look for in any LED's you use on board the boat or at the house as a slight variation in current or voltage can blow the LED electrical junctions destroying the LED.

I have converted many of the lights on board BIANKA to energy efficient LED's from the masthead anchor light to the ones over the galley and cabin. They worked so well in the boat I wondered how they would do in the house. So I went about building a simple system that would meet my needs. It's easy to do with off the shelf components the heart of which is a Morningstar SL-10L-12V SunLight 10 Amp Charge Controller LVD
This unit does a number of things.
1) It turns on up to 10 amps of 12 volt LED lights at dusk and off at dawn. It also has timed switched presets if you don't won't to have the lights on all night.
2) It controls the charge to battery from the solar panel(s). It also has a jumper to select charge profiles for Flooded or Sealed batteries.
3) It uses the output of the solar panels to sense when dusk begins and turns on the lights and also when dawn begins and turns them off.
4) It has a low voltage disconnect it will disconnect the lights from the battery bank once the battery voltage drops below 11.8 volts to protect the battery bank until the solar panels once again are able to start charging the battery again.
Connections are simple:
Two terminals are for the solar panel connections.
The next two terminals are for the 12 volt battery
The last connections are for the wiring to the LED lights.
I use In-line AGC Fuse Holders on the output to LED lights and the battery to protect against a short circuit. It's for safety and I recommend it.
Two Siemens 12 volt 75 watt solar panels that were left over from a boat project that changed direction provide the charging for the batteries. I've mounted them on the south side of the house.

As you can see one has not yet tilted one of the panels for optimum sun exposure but, it's on the to do list though the system works fine as is anyway.
As you can see one has not yet tilted one of the panels for optimum sun exposure but, it's on the to do list though the system works fine as is anyway.
The batteries are two Sealed Lead Acid Battery (12V; 35 AH; UB12350) batteries connected in parallel.
The only reason I am using two is because one arrived with the lug damaged and the other one was the replacement. So rather than just have one sitting around sulfating I put both of them to work on the LED house system.
I use two types of LED's in the system. One is a Disc Type G4 Base Side Pin 6 SMD LED 10 - 30 Volt DC unit. I like to use the warm white version.
The other LED light I use is the BEKA Light from BEBI Electronics. ( BLOG UPDATE: Bebi Electronics is no longer selling LED Lights )It was designed to be used on a boat as a cockpit anchor light. But, I use them in the house when I want to illuminate bigger rooms like the living room or dining area. I ordered mine with warm colored LED's facing downward and the bright white LED's for the outside perimeter facing ones.
The downward facing LED's provide a warm incandescent like look directed downward. While the bright white LED's bounce off the walls and illuminate the room with a bright indirect light.
Just about every room in my house is lit up by one of these two LED lights. They provide enough illumination so you can walk from room to room without ever having to turn on a light. Since they are charged by solar energy once the system is in place there are no additional costs and the rooms are lit from dusk to dawn. During Hurricane Sandy my neighbors wondered why I was the only one who seemed to have power when they saw my LED lights on. On the boat it's all about saving as much energy as possible by being as energy efficient as possible. On land this also has the added benefit of saving you money and also providing light when the electrical grid goes down as it did after Hurricane Sandy.
Tuesday, August 07, 2012
A LIGHT PROJECT
I bought another BEBI BEKA LED light for the boat. I find it to be a rugged and versatile light for use on board. It can also serve as a backup anchor light should the one on the top of the mast fail at anytime. I've also mentioned before how much I like to use Anderson Power Pole connectors for various uses on board the boat. So with the new light on board and a spare 12 volt cigarette power plug I came up with an adapter project that will come in useful:

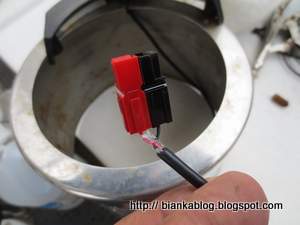
First I used a Crimper made for the Anderson Power Poles to crimp connectors for the BEBI Beka LED light:

I then checked with an ohm meter the positive wire of the cigarette lighter plug. This is important step to make sure you have the correct polarity in the wiring of the connectors. If wrong you could blow a fuse at worse you could have an electrical fire on board. Best to avoid both situations by checking the wiring:

Once the connectors are crimped on the wires they are inserted into the Anderson color coded housing and are ready to go and be used in various configurations on board:

For example I use the BEKA light for nighttime illumination in the cockpit. But, I could also easily add an extension cable between the cigarette plug and the BEKA light and hoist it up the mast as an emergency anchor light if needed.
First I used a Crimper
I then checked with an ohm meter the positive wire of the cigarette lighter plug. This is important step to make sure you have the correct polarity in the wiring of the connectors. If wrong you could blow a fuse at worse you could have an electrical fire on board. Best to avoid both situations by checking the wiring:
Once the connectors are crimped on the wires they are inserted into the Anderson color coded housing and are ready to go and be used in various configurations on board:
For example I use the BEKA light for nighttime illumination in the cockpit. But, I could also easily add an extension cable between the cigarette plug and the BEKA light and hoist it up the mast as an emergency anchor light if needed.
Friday, June 29, 2012
CHECKING THE MAST LIGHTS
I pull the mast on BIANKA every year. I do this because having the mast up while the boat is on land puts stresses on the boat that are not as large when it is in the water because the hull does not move as on a mooring. It also allows me to have easy access to the chain locker and the windlass motor. It also allows me to inspect the mast and checkout the wiring and lights since the mast is on ground level. I've mentioned how much I like to use Anderson Powerpole Connectors  on board for connections. It also allows me to make various adapters that help in testing various items around the boat.

Using a small 12 battery and adapters made using Anderson Powerpole Connectors and matching connectors for the mast fittings makes checking the mast light wiring an easy task.

Using a small 12 battery and adapters made using Anderson Powerpole Connectors
Sunday, August 15, 2010
LIGHTS OUT? LEDS ON!

Well, a second florescent lighting fixture on board BIANKA went out the other night. In the past I would send them back to the manufacturer and get them refurbished. But the price keeps going up. Seems like it might be a good time to convert these fixtures to LED technology. This has been on the TODO list for awhile. FYI BOAT BITS has a link to a French Sailing magazine that recently did some tests on a number of LED lights. In the meantime I continue to use the solar powered Lightship units on board which continue to provide enough solar powered LED illumination in critical areas (like the head) that getting the defunct fluorescent fixed is not a super critical issue. Always good to have a backup I say.
Tuesday, December 29, 2009
WHAT WORKS: SOLLIGHT LIGHTSHIP LED LIGHTS
Several years ago I bought two items called Lightships which are made by a company called Sollight. They have turned out to be one of the most reliable and trouble free items on board and just do what they are supposed to do. A sailor could not ask for more than that. They are small LED light fixtures that are solar charged. They look like miniature lunar lander or some high tech bug with their three legs and suction cups. The suction cups are there so you can mount them to a hatch like this:

Those suction cups are pretty tenacious too. The units stayed attached to the overhead hatches all season until I pulled them off to be used at home in the winter.
On the opposite side is a small solar panel that charges up the battery contained in the unit and a switch as shown here:

The three position switch allows the unit to switch on two white LEDS for general illumination or a red LED only so that night vision is not ruined while moving about the cabin. The third position is the off position and no light will come on at dusk. I purchased two units three years ago. I use one in the main cabin and the other in the head. I would not say that you'll be able to read by their light but, they will shed enough light so you won't be tripping over things in the middle of the night. The one I installed in the head is about as bright as a night light but, not so bright that it will jolt you awake like the other lights on board will do. Another good thing is you never have to worry about turning them off because they might drain the battery as they shut off at dawn and start charging with the first rays of dawn. They also make it look like someone in the cabin as they turn on at dusk even if you are ashore and therefore can act as a possible deterrent to a thief who does not like to take any chances. They get Capt. Mike's approval because they just plain work.
Subscribe to:
Posts (Atom)


.jpg)
.jpg)


