Showing posts with label removal. Show all posts

Tuesday, April 29, 2014

RETHINKING PROPANE: Dismantling the Hillerange Seaward Stove Part Three

I was away from the boat for two weeks as work got in the way once again. But, then it will allow me to pay the boatyard for dropping the morning back in the water. So it is a trade off. When I got back on board I continued on the propane project which entails partially dismantling the Hillerange Seward Stove that has been on board since 1986. Due to corrosion in the burner area and the expense of rebuilding it I decided to abandon it's use as a stove and oven and use alternative cooking plans. I was able to remove most of the burner, controls and manifold on my last visit to the boat. On this visit I planned to take a look at the oven and see what I could remove there. Since I've owned BIANKA since 1995 I think I've used the oven twice. Frankly, trying to start it was always difficult and somewhat scary. Which is why I won't miss it much. But, I did store some cooking items inside of it as shown below:
   
Though they were just covers and bowls and oven pans in the limited space available. So since I no longer  plan on using the oven I thought it would be good to remove the burner and whatever else I could take off the boat. First I removed all the "stuff" that was stored in the oven:

The area needs a good cleaning and there is some rust that needs to taken care of. First thing was remove the oven tray. I found this was just held in place by two screws located in the back of the oven:

Once the tray is removed I had easy access to oven burner:

A screw on the left side holds it in place:

Over on the right side is a nut that connects the pilot light to it's stainless steel feed pipe securing the right side:


Once the screw on the left side and the pilot feed nut are removed the whole burner assembly is easily removed:


Removing the oven tray and oven burner created a much bigger storage area in the now unused oven space:


It needs a good cleanup  and some rust removal and I think I'll do some re painting in the future. But, I am happy with that the space that opened up by removing the burner:


I was now able to store all of the pots and pans I use on board in the oven area. Including my cast iron frying pan and four quart pressure cooker.  I still need to remove some of the oven pans which I will no longer use too. With the unused oven burner parts removed and the additional storage space created, I'll turn my attention to cleaning up the top burner area.

Monday, July 16, 2012

EASY ELECTRIC BOAT MAINTENANCE PART ONE: REMOVING THE MOTOR

It's been five years since I pulled out BIANKA's 27 horsepower diesel engine and converted to electric propulsion. One of the reasons for the conversion was my belief that it would require less maintenance than the diesel engine it replaced. Happily, I've found this is the case as the only real maintenance I've had to do in five years is replace the oil in the Honda 2000 generator once a year.


 I'm usually a "if it ain't broke don't fix it" sailor. But, this year I decided to tackle replacing the shaft coupling which did not require urgent replacement but, since nothing else was pressing I decided to swap it out. More on that in a later post.

Truth is I've never had to touch the motor since I installed it five years ago but, to make for easier access to the shaft coupling I decided it would be a good idea to remove it. It turned out to be extremely easy something I did not often say when I had to do some type of maintenance on the diesel. First, I removed the stainless steel cover that enclosed the belt and pulleys:

The removal of four small cover screws accomplished this. I then removed power from the system by taking off the 48 volt battery lead. I then marked the motor case, terminals and motor cables with colored tape so I would be sure to connect them back up to the correct terminals.


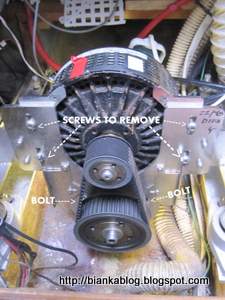
 If I were reconnect them wrong it would not be disastrous but, the motor would just operate in reverse of what I was use to. Better to reconnect the cables right the first time. With power disconnected and the cables marked it was time to loosen the motor to take off the belt. This is easily done by loosening four screws and two bolts as shown below:

Once the screws and bolts were loosened the motor is easily slid down the bracket and the belt was easily removed:


This is also how I would change the belt too. I think it would only take about ten minutes. As I inspected  the belt I could see it was still in very good shape even after five years of operation. So there was really no need to change it. I'll show how easy it was to remove the motor in the next post.


Monday, August 31, 2009

Repairing a Maxwell-Nilsson VR-700 windlass Part 2: Removal

So the Maxwell Nilsson VR-700 was repaired rather painlessly including very little pain to my wallet. For about six bucks of square brass key stock I could now lift BIANKA's anchor with the push of a button and also have a lifetime of spare key stock to boot. But, the joy did not last long. I went forward one day to lift the anchor and the Gypsy moved slightly and then stopped. I could still hear the motor below deck turning. This was not good news.
I proceeded to try and find the cause. I pulled off the upper drum and could see that both the chain Gypsy and the shaft were not spinning under load. This could only mean a problem in the gear box below deck. How did this happen? It could have been a clumsy crew member who stepped on one of the deck mounted windlass switches after the chain had been secured to the Sampson Post and because I might have forgotten to switch off the windlass circuit breaker. I know better to NEVER step on these switches but, for the ocassional crew it is an easy thing to forget. Whatever the reason the windlass will have to come out and that can not happen until the end of the season. Until then it's heave away and haul away on the anchor chain. But, it actually got even worse. Sometime that summer BIANKA was hit by lightning directly or by a side strike. The hit did a little damage taking out the heavy duty Pro Mariner battery charger and a few other electrical items. But, it also affected the windlass so that it only operated in one direction. True to Murphy's law of the sea of course that would be in lowering the anchor not raising it. So there are two problems that need to be addressed.


NOTE: BEFORE ATTEMPTING ANY REMOVAL AND REPAIR ON AN ELECTRIC WINDLASS MAKE SURE THAT ALL POWER TO THE WINDLASS AND IT'S CONTROL CIRCUITRY IS OFF!


The first issue I had was how to drop the motor and gearbox. I first tried to turn the bolts on the deck plate of the windlass.

I soon realized that they were not going to budge. So it was time to squeeze my six foot two frame into the chain locker. I laid down some old water skiers life jackets that were on board on top of the chain and laid down on my back to look at how to remove the windlass. Strangely I found that being in the chain locker to be somewhat womb-like and cozy. Even conducive to closing ones eyes and taking a nap. But, I had work to do and getting the windlass out was job one. Below is a photo of the VR-700 windlass mounted to the deck. In the background are some of the wiring for the windlass and solenoids that control it's operation.

I don't know whose idea it was to install all this wiring inside the chain locker but, I plan on changing it in the future. I understand the windlass needs to be mounted here but, to have all this other wiring and control relays in there is asking for trouble. The chain locker can be a rather wet and damp environment. Just the kind of conditions for corrosion to take hold as you can see by the bluish hue of the bolts holding the deck deck plate for the windlass in the photo above.

Looking up at the bottom of the windlass I saw three bolts and a mysterious grease spot. Which is a very important clue to maintenance of this windlass and others of a similar design. Below is a what the windlass looks like from below:
I thought there might be a bolt missing and that is why grease was leaking from gear box via the hole. But, I would later find out why the grease was there. Back to removing the windlass. The two electrical lugs on top of the motor were disconnected. Then it was rather easy procedure. Loosening and removing the three bolts on the bottom of the gear box and then sliding the motor and gearbox assembly downward (with a little nudging/tapping from above) it slid out as one assembly.
NOTE: WINDLASSES ARE HEAVY AND CAUTION SHOULD BE EXERCISED WHEN REMOVING THEM. DO NOT PLACE ANY PART OF YOUR BODY UNDERNEATH IT WHEN YOU ARE REMOVING IT. IT CAN DROP SUDDENLY AND INJURE YOU IF YOU ARE NOT CAREFUL.
Below is a photo of the windlass removed from the boat with the shaft.

Now it's time to figure out what the problems are and how to repair them.