Tuesday, July 31, 2012

FIXING A HOLE


Fixing A Hole

You  might be breezing along one day doing six knots enjoying the ride when all of a sudden there is bang and the boat suddenly stops and you hear water flooding in down below. What do you do? Hopefully you never have to answer this question.  Happily, the folks at Yachting Monthly have purposely holed their test boat and tried several methods to stem the incoming flood of water on their "crash boat". Their tests and results are worth a look so if you should happen to get a hole in your boat you'll know what to do to save it.


Saturday, July 28, 2012

INSTRUMENTATION PROJECT: A change of plans

Back in May I mentioned how I was planning on reusing the case from Kings 8001 Loran unit for the new propulsion battery bank instrumentation project at the helm. Well those plans have changed. It seemed like a good idea. In addition to the case I was going to use the metal shield from between the circuit boards to mount the voltage and current meters:

I cut the panel to size and then used paper cut outs to check the lay out of the voltage and current meters. At first things seemed to fit if a little awkwardly::


But, when I tried the actual meters I realized they were not going to fit in the space available:
 

So then I thought I would just use the case to house the digital volt meters and mount the current meter in a second box:

But, the four pole on/off switch still made things a little tight. So I decide to scrap the idea of using the old Kings Loran box for this project and come up with a new design for the instrumentation at the helm. I'll show what I came up with in a future post.

Thursday, July 26, 2012

SOLAR BIMINI PROJECT CONTINUED

I continue to work and improve on BIANKA's solar bimini. One of priority projects is to replace the clear Plexiglas sheet between the two forward solar panels. This transparent sheet does two things. It helps prevent water from coming down into the main hatch and also allows me to observe the sail as I am raising it. If you have a bimini or dodger made of Sunbrella fabric it will prevent you from seeing the sail unless you have a window sewn into it. 
As I mentioned the clear plexiglass sheet I installed last year  needed to be replaced because it cracked during Hurricane Irene. This time I decided to use Lexan which is stronger and more UV resistant. I found a suitable sized piece in stock at a local Home Depot store. It just need some minor trimming. I also used a few pieces of 1/8" thick aluminum bar I had not used on the solar panel mounting system because I found them too thin to support the solar panels. But, as a  support for the Lexan piece they would be perfect to use.
I've mentioned before how useful having a roll of  Scotch 8981 Filament Tape on board is:


I've used it as strapping to support the solar bimini frame as I was fabricating it. I also found it useful in this project to temporarily secure the aluminum support bars to the bimini frame while I trimmed the Lexan piece and before I fixed them in place permanently:

The filament tape is much stronger than many other tapes and holds very good with minimum residue when you remove it. Once I had the Lexan piece trimmed to fit between the panels I laid it over the support bars and secured it with screws to the solar bimini frame:


I have not yet removed the protective backing material from the Lexan sheet in the above photo but, you get the idea. I'm not yet done with my plans for the solar bimini on BIANKA. But, that project will have to wait for a later date. In the meantime the solar bimini provides both shelter and energy on board and that's a good thing.


Monday, July 23, 2012

NEVER LEAVE THE BOAT

"Never leave the boat!"  Those words spoken by the cook of the patrol boat in the movie Apocalypse Now are good advice.  If you do leave the boat make sure you have an easy way to get back on this video shows why:


Also make sure you have a good reason to go ashore and not have someone stay on board to keep an anchor watch. The video also shows why it is good to make sure your ground tackle and anchor are up to the task.  I'm certainly glad I got some new chain  this year especially after seeing this video.
Another good thing to do is keep the boat in sight if you do go on land and keep a weather eye out for changing conditions and get back early if they do. Oh yeah, make sure you have real good life jackets on board in the dink.


MORE THOUGHTS:  Watching the above video reminded me of the time I attempted to join the flotilla welcoming back Reid Stowe from his "Thousand Days at Sea" voyage. I had not left the boat but, a long fetch across the bay and building winds made the bow of BIANKA pitch wildly up and down. Not as much as this boat but, enough to make raising the anchor rather difficult. Especially when the windlass failed.  It was a learning experience and one I would rather not repeat.

Wednesday, July 18, 2012

EASY ELECTRIC BOAT MAINTENANCE PART TWO: SHAFT COUPLING REPLACEMENT

One of the hardest areas to work around when BIANKA had the Westerbeke diesel was the stuffing box. Because the boat had a V Drive transmission the prop shaft ran under the engine and transmission:

Trying to get two wrenches to adjust the stuffing box was not in the category of what I would call fun. There was hardly enough room to move the tools because of the tight space:

Just looking at these old pictures of the limited space and the grime gives me the shakes.  That all changed once I put in the Thoosa 9000 electric propulsion system. Now access to the stuffing box for adjustment is no longer problematic as it was with the diesel:


The area is easy to get to and open and which means there is a lot of range to use the wrenches for adjustment. Best of all it is clean!  Capt. Mike is very happy about that. As I mentioned I've gone five years without a lot of maintenance on the system including the stuffing box once the initial adjustments were done.
I think part of the reason is because there is so little vibration when using an electric motor for auxilary propulsion there is little need to adjust or replace the packing around the shaft when compared to the vibration of operating a diesel engine. But, since this is a standard stuffing box and not one of the newer Dripless Shaft Seal type stuffing boxes that does not mean they won't drip a little bit. Indeed that is what they are supposed to do to make sure the packing is lubricated and not compacted to tightly around the shaft. 


 When I purchased my electric propulsion system five years ago. I had the distributor at the time provide me with a shaft coupler to connect the motor with the prop shaft. Unfortunately, the one he provided was made of steel but, not stainless steel. Since I was new to the idea of electric propulsion I trusted his choice. Here are the couplings side by side:


 Well, five years of drips from the stuffing box had started to rust one end of the original steel shaft coupling. Now there's a saying that "rust is natures Loctite" and it may perform that function for awhile but, it won't do that forever. Which brings me to why I'm doing this maintenance sooner rather than later.


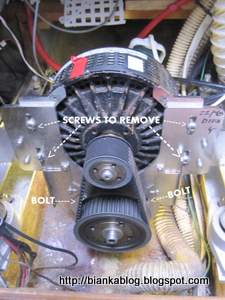
 The fact is a stainless steel coupling would have been a better choice to connect the stainless steel shafts of the motor and prop. I decided that removing the motor would allow better access to the coupling and since removing the electric motor is easy and weighs only about 45 lbs it was a no-brainer. I just removed the four screws and two bolts shown in the previous post and lifted the motor away from the bracket :


Access to work on  the rusted coupling was now even better:


I was hoping that I would be able to remove the eight bolts holding the two piece shaft coupling to the shafts easily just using a ratchet with the proper allen head bit:


But, unfortunately despite spraying the bolts with PB Blaster  over several weeks I was only able to remove four of the bolts with the ratchet.  I guess it's true that "rust is natures Locktite" after all. Oh well time to take out the Dremel Tool  and cut through the rusted bolts in the coupling with a  Dremel reinforced cut-off wheel.


 and remove the old coupling:

Here is an inside view of the removed rusted coupling:   


and a look at the stainless steel replacement:


Once to old shaft coupling was off I cleaned the shafts with some denatured alcohol and heavy duty paper towel and clamped on the new coupling and torqued it down:


CAPT. MIKE NOTE: Before I put the screws in the coupling I coated the threads with Ultra Tef-Gel  which will help prevent any future corrosion issues and make it easy to remove the coupling in the future without having to use a Dremel tool to cut the through the screws. 

Once that was done it was a simple process of putting the motor back onto the frame. I tightened the two bolts and four screws and the motor was mounted ready to be hooked up to the controller:


Well, that was an easy repair and I did not have to contort and squeeze my six foot two inch frame into positions and spaces it was not meant to be in. I did the entire motor removal and coupling replacement while remaining inside the main cabin of BIANKA.  There was no need to empty the cockpit lockers and squeeze through a hatch like when I had the diesel on board. It's just another reason why I love my Thoosa 9000 electric propulsion system.
Since I had already removed the motor . It seemed like a time to check out the motor after five years of use. I'll show that in a future post.

Monday, July 16, 2012

EASY ELECTRIC BOAT MAINTENANCE PART ONE: REMOVING THE MOTOR

It's been five years since I pulled out BIANKA's 27 horsepower diesel engine and converted to electric propulsion. One of the reasons for the conversion was my belief that it would require less maintenance than the diesel engine it replaced. Happily, I've found this is the case as the only real maintenance I've had to do in five years is replace the oil in the Honda 2000 generator once a year.


 I'm usually a "if it ain't broke don't fix it" sailor. But, this year I decided to tackle replacing the shaft coupling which did not require urgent replacement but, since nothing else was pressing I decided to swap it out. More on that in a later post.

Truth is I've never had to touch the motor since I installed it five years ago but, to make for easier access to the shaft coupling I decided it would be a good idea to remove it. It turned out to be extremely easy something I did not often say when I had to do some type of maintenance on the diesel. First, I removed the stainless steel cover that enclosed the belt and pulleys:

The removal of four small cover screws accomplished this. I then removed power from the system by taking off the 48 volt battery lead. I then marked the motor case, terminals and motor cables with colored tape so I would be sure to connect them back up to the correct terminals.


 If I were reconnect them wrong it would not be disastrous but, the motor would just operate in reverse of what I was use to. Better to reconnect the cables right the first time. With power disconnected and the cables marked it was time to loosen the motor to take off the belt. This is easily done by loosening four screws and two bolts as shown below:

Once the screws and bolts were loosened the motor is easily slid down the bracket and the belt was easily removed:


This is also how I would change the belt too. I think it would only take about ten minutes. As I inspected  the belt I could see it was still in very good shape even after five years of operation. So there was really no need to change it. I'll show how easy it was to remove the motor in the next post.


Thursday, July 12, 2012

SHACKLE UPGRADES


In addition to the 200 feet of new galvanized anchor chain I also ordered two special shackles from 1st Chain supply. Normally, the weak link (no pun intended) in the anchor system is the shackles used to connect the chain to various thimbles and swivels. The problem is the shackles that one finds in the Marine store that fit inside the chain links have working loads less than the chain they connect to. The ones that are as strong as the chain have pins that are two big to fit inside the chain links.
There are two solutions to this problem. You can order the chain with oversize links at each end. but, order lead times are much longer (four to six weeks). The other solution is to use special alloy shackles that are as strong or stronger as the chain links they connect to. That is what I did. 1st Chain Supply has these alloy shackles available on their website they are in stock and I was able to order them when I ordered the chain. As I usually do before I connected them to the chain I coated the threads with Tef Gel to makes sure I will be able to take them off when I want to in the future.

Saturday, July 07, 2012

ANCHORS AWEIGH

"RUST NEVER SLEEPS"


When I bought BIANKA in 1995 it had one hundred feet of chain of 3/8" connected to 140 feet of pliant braid on board and a 33 lb Bruce anchor. It has worked well over the years for me in all kinds of conditions. Including a brush with a catagory one hurricane Earl in eastern Long Island. I notice it starting to rust over the years but, the rust got knocked off with the first time I anchored each season. At least that part that entered the water. I rarely had to put out more than 75 feet of chain when anchoring. Which meant the remainder of the chain sat in the damp chain locker rusting away. I had a "yikes"moment last year when I saw some of this severely rusted chain go over the anchor roller. I thought it is about time I got some new anchor chain as after twenty six years BIANKA's original anchor chain really did not owe me anything.

I had a hard time trying to figure out what size chain to order. I was pretty sure it was 3/8" chain but, the chain was so rusted I had a hard time figuring out what size it really was by measuring it as this photo comparing the new chain to the old shows:

These two chains were originally the same size but, rust has severely reduced the size of the original chain on the bottom. Just to be sure I would buy the correct chain I ordered a one foot sample of 3/8" anchor chain for ten dollars. I don't want to make a mistake in ordering almost a thousand dollars worth of chain weighing several hundred pounds as the shipping is expensive. I originally thought I had 125 feet of chain on board but, it really was only 100 feet. But, I ordered 200 feet of new chain so I would be able to put out  more scope when anchoring in the future with the chain. I ended up with a half barrel (200 feet) of chain being delivered. I bought it from 1st Chain Supply which had a pretty good price including delivery for 3/8" ACCO BBB galvanized chain.
Now it was time to remove the old chain. Since the boat was still in the boatyard I removed the Bruce anchor and used the windlass to drop the chain to the ground:

and onto a piece of scrap shrink wrap to make sure I would not be picking up a lot of dirt when I picked the chain up:

 Once the chain was off the boat I then removed the pliant braided anchor line from the chain locker. What remained inside the chain locker was about 5 pounds of rusted anchor chain:
I vacuumed the rust up and cleaned out the anchor locker.  I then took the rust covered pliant line that had been sitting under the chain for the past sixteen years to a laundromat put it into a machine with some Woolite :


After it was washed I bought it back to the boat and using my Forespar Nova Lift and hoisted the line up in a large duffle bag:

I then laid the line out over the deck for two or three days to dry out before putting it back into the chain locker  and attaching the new chain to it. After I attached the chain to the line I marked the chain with a bunch of red cable ties to let me know when deploying the chain that I am reaching the end of the chain. I marked it about 15 feet from the end:

I will eventually mark the chain with both paint and cable ties at various points along the chain 25, 50, 75, 100 etc... so I will  know how much has been let out. But, for now cable ties will do. I was a little concerned that perhaps 200 feet of chain might make the boat a little bow heavy but, happily that is not the case. The best thing is I can now sleep better at anchor knowing that BIANKA rides on some brand new anchor chain.


Tuesday, July 03, 2012

SURVEY SAYS

While getting BIANKA ready this spring I noticed a ship hanging out off the coast:

It's the NOAA coast survey ship Thomas Jefferson and it is conducting surveys of the nearby waters that BIANKA sails in. Which is good to see. Updated charts are always a good thing in my opinion. Looks like I'll be getting some new chart chips for my  Chartplotter , paper charts and downloads  in the near future once they are released by NOAA: