
Showing posts with label water pump. Show all posts
Showing posts with label water pump. Show all posts
Tuesday, December 05, 2017
MORE GIFTS FOR SAILORS
Friday, May 19, 2017
A PROBLEM IS NOT ALWAYS A PROBLEM
Things always seem to be breaking on a boat except when they are not really broken. Let me explain. I often fall into the trap of expecting the worse when it turns out there was never really a problem at all. One must resist the urge to tear apart a system until one has sat back and thought about why something that was working yesterday is not working today. It is useful to ask what may have changed before you pull out the tools. Even though I know this I still get caught at least once or twice a year thinking some device has failed when it actually was not the case. Here is an example from last fall:
Even as I commence spring outfitting this year I was mistaken I had another pump failure. I filled one of BIANKA's water tanks so I would have some water to use for cleaning up the boat. I then turned on the water pump switch heard it come on then stop. But, when I went to the faucet there was no water pressure. Another pump failure I thought. I pulled out my volt meter and went to check the voltages at the water pump connections. No voltage. Aha must be a bad switch at the electric panel. It took me a few minutes to realize I was not turning on the water pump breaker but, was actually hitting the washdown pump switch instead!
Even as I commence spring outfitting this year I was mistaken I had another pump failure. I filled one of BIANKA's water tanks so I would have some water to use for cleaning up the boat. I then turned on the water pump switch heard it come on then stop. But, when I went to the faucet there was no water pressure. Another pump failure I thought. I pulled out my volt meter and went to check the voltages at the water pump connections. No voltage. Aha must be a bad switch at the electric panel. It took me a few minutes to realize I was not turning on the water pump breaker but, was actually hitting the washdown pump switch instead!
"To see what is in front of one's nose requires a constant struggle." -- George Orwell
Tuesday, June 10, 2014
GETTING THINGS BACK TO NORMAL:Pressurized Water System
After I removed the Paloma on demand water heater I was left with doing something with the water supply and hot water output hoses:

The sinks on board BIANKA have two ways to provide water. One is by foot pumps which is what I most often use. The other is a pressurized water system which requires an electric pump to provide the water. The Paloma water heater was hooked into this system. I thought I might be able to get away with just capping the supply hose. But, as I found out after I turned on the water pump the water back fed through the hot water outlet hose. So I would need to reconnect them now that I have removed the water heater. Two 1/2 inch elbows and a short piece of 1/2 inch hose allowed that to be easily done:

I did not like the idea of the hoses just floating there so I arranged for a little more secure mounting of them. I used a Cable Tie Saddle Mount and attached it to the bulkhead:

Then used a cable tie to secure it to the mount:

With the hose secure I turned on the pressurized water pump and everything work as before except I no longer was able to have hot water. But, I have come up with an alternative hot water system that I'll be showing in the near future.
The sinks on board BIANKA have two ways to provide water. One is by foot pumps which is what I most often use. The other is a pressurized water system which requires an electric pump to provide the water. The Paloma water heater was hooked into this system. I thought I might be able to get away with just capping the supply hose. But, as I found out after I turned on the water pump the water back fed through the hot water outlet hose. So I would need to reconnect them now that I have removed the water heater. Two 1/2 inch elbows and a short piece of 1/2 inch hose allowed that to be easily done:
I did not like the idea of the hoses just floating there so I arranged for a little more secure mounting of them. I used a Cable Tie Saddle Mount
Then used a cable tie to secure it to the mount:
With the hose secure I turned on the pressurized water pump and everything work as before except I no longer was able to have hot water. But, I have come up with an alternative hot water system that I'll be showing in the near future.
Sunday, September 29, 2013
PUMP IT UP: Repairing a FloJet 4300 Series Washdown Pump. Part Two
After diagnosing the problem with BIANKA's FloJet washdown pump and losing and then finding the replacement pressure switch. I was finally able to start the repair. The first issue to surface was to find which replacement pressure switch kit to use as there are several available. I contacted FloJet customer service who requested the model number and serial number for my pump. It turns out I need the Flojet 02090118 40 PSI Pump Switch Kit for my model 4305-143 FloJet pump. Included with the replacement pump kit is a list of FloJet models and there replacement switch part numbers:

My FloJet pump has been on the boat since I bought it in 1995 and probably longer perhaps as far back as 1986. In the time since FloJet has changed the design of the pressure switch and as a result there are less parts involved and some that are eliminated altogether. The instructions show which parts need to be removed and how to install the new ones:

Here is what my pumped looked like after I removed the old pressure switch and the parts I would be discarding:


Much less parts to deal with than the old pump. There are three pump diaphragms that come with the new kit:

As explained in the instructions which one you use depends on the liquid that will be flowing through the pump. They are labeled V, B and E. Which stand for Viton, Buna and EPDM. For potable water and seawater the instructions say to use the diaphragm labeled E for EPDM. There are some subtle changes in the replacement diaphragms too. Here is a new Buna diaphragm on the right compared to the old diaphragm removed from the pump on the left. Notice that the lip on the new diaphragm is a little different. So it is best to discard the old one and not keep it around as a spare:

Here is the new EPDM diaphragm installed on the pump:

The new Flojet 02090118 40 PSI Pump Switch comes with black wires attached:

I swapped them with the red wires (also included in the replacement kit) since the switch will be switch the + 12 volt voltage:

Once the EPDM diaphragm was installed on the pump body one carefully aligns the switch module so that the diaphragm is not pinched and screw holes are aligned and screws one screw snug and then the other to about 9-10 inch pounds. I just snugged them by feel and had no leaks.
In addition to replacing the switch I also took the opportunity to add Anderson Powerpole connector to the pump and switch wires. This will make it easier to troubleshoot the switch or even by pass the switch completely:

With the new pressure switch installed and Powerpole connectors installed the pump is ready to be reinstalled:

I was curious about the defective pressure switch. I had to cut the plastic off of the switch area and took a look at it after it was removed and it was a little more complicated than I imagined:

There are springs and two contacts that connect to each of the terminals. The failure of the switch seemed to be a combination of corrosion and bad contacts. Still it lasted eighteen plus years without a problem. Hopefully the replacement will last just as long.
My FloJet pump has been on the boat since I bought it in 1995 and probably longer perhaps as far back as 1986. In the time since FloJet has changed the design of the pressure switch and as a result there are less parts involved and some that are eliminated altogether. The instructions show which parts need to be removed and how to install the new ones:
Here is what my pumped looked like after I removed the old pressure switch and the parts I would be discarding:
Here is what comes with the new replacement pressure switch kit:
Much less parts to deal with than the old pump. There are three pump diaphragms that come with the new kit:
As explained in the instructions which one you use depends on the liquid that will be flowing through the pump. They are labeled V, B and E. Which stand for Viton, Buna and EPDM. For potable water and seawater the instructions say to use the diaphragm labeled E for EPDM. There are some subtle changes in the replacement diaphragms too. Here is a new Buna diaphragm on the right compared to the old diaphragm removed from the pump on the left. Notice that the lip on the new diaphragm is a little different. So it is best to discard the old one and not keep it around as a spare:
Here is the new EPDM diaphragm installed on the pump:
The new Flojet 02090118 40 PSI Pump Switch
I swapped them with the red wires (also included in the replacement kit) since the switch will be switch the + 12 volt voltage:
Once the EPDM diaphragm was installed on the pump body one carefully aligns the switch module so that the diaphragm is not pinched and screw holes are aligned and screws one screw snug and then the other to about 9-10 inch pounds. I just snugged them by feel and had no leaks.
In addition to replacing the switch I also took the opportunity to add Anderson Powerpole connector to the pump and switch wires. This will make it easier to troubleshoot the switch or even by pass the switch completely:
With the new pressure switch installed and Powerpole connectors installed the pump is ready to be reinstalled:
I was curious about the defective pressure switch. I had to cut the plastic off of the switch area and took a look at it after it was removed and it was a little more complicated than I imagined:
There are springs and two contacts that connect to each of the terminals. The failure of the switch seemed to be a combination of corrosion and bad contacts. Still it lasted eighteen plus years without a problem. Hopefully the replacement will last just as long.
Tuesday, September 03, 2013
PUMP IT UP: Repairing a FloJet 4300 Series Washdown Pump Part One
Pump it up when you don't really need it.
Elvis Costello
At the end of last season I discovered two of the four electric pumps on board BIANKA did not work. They both were feed from the same circuit breaker but, do not operate at the same time. One was the Wash Down pump used to clean the anchor chain after it's been laying on mucky bottoms. The other was the Macerator pump that is used usually once a year on haul out after I rinse out the holding tank. Neither one would power up. Sounded to me like a power issue since both pumps were fed from the same circuit. Having two pumps fail at the same time seemed against the odds. Sounded to to be an easy fix. Most likely a power issue. First I measured the voltage from the circuit breaker panel it read the nominal 12 volts. Well, then gotta be the switch that switches between which of the pumps will be energized. But, when I checked the switch it was good. Oh well. Looks like both pumps did fail at the same time. Since one pump was for the wash down and used every time I hoist the anchor and the other pump was for the macerator and really only used one time each year when cleaning and winterizing the holding tank for storage. I decide the wash down pump was the priority.
The wash down pump is a Flojet 4300 series pump. A 4305-143 to be precise and had been on the boat since I bought her in 1995. It had worked well until now. The pump is located in behind a panel the head area along with the pressure water pump and the shower sump pump:

Pretty easy to get to unlike the macerator pump which is buried under some cabinetry and hoses. Though because all the wiring was connected with crimped splices I had to cut the wires to remove the pump from the cabinet. But, I decided to rewire the pump with Anderson Powerpole connectors to make future removal of the pump and trouble shooting easier.
After removing the pump I looked for anything obvious that might have caused the failure:
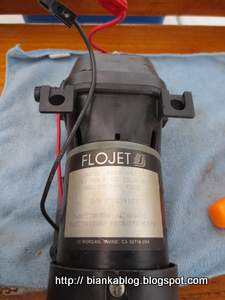
Not seeing anything suspicious I followed red 12 volt lead that went into a small module on the pump and exited out the other side and connected to the motor. The is the pressure switch that shuts off the pump when the pressure reaches a certain level. Taking the cover off of this module exposed it's connections:

The wash down pump is a Flojet 4300 series pump. A 4305-143 to be precise and had been on the boat since I bought her in 1995. It had worked well until now. The pump is located in behind a panel the head area along with the pressure water pump and the shower sump pump:
Pretty easy to get to unlike the macerator pump which is buried under some cabinetry and hoses. Though because all the wiring was connected with crimped splices I had to cut the wires to remove the pump from the cabinet. But, I decided to rewire the pump with Anderson Powerpole connectors to make future removal of the pump and trouble shooting easier.
After removing the pump I looked for anything obvious that might have caused the failure:
Not seeing anything suspicious I followed red 12 volt lead that went into a small module on the pump and exited out the other side and connected to the motor. The is the pressure switch that shuts off the pump when the pressure reaches a certain level. Taking the cover off of this module exposed it's connections:
Nothing unusual but, I did notice a little melting and discoloration of the wire and some melting on the housing of the switch:

Well this certainly was worth investigating. The connections to the wires looked good but, when I took out my meter and measured across them I found a high resistance across the leads:

I measured 4 meg ohms not a totally open circuit but, high enough to prevent the pump from operating. I decided to first remove the spade connectors clean the contacts to see if that improved the readings:

Having done that I still measured a high resistance. So I decided to remove the pressure switch module from the body of the pump:

I had no parts diagram of this part of the pump so I could not be sure how things were supposed to look. But, when I went back and measured across the leads of the pressure switch I read about three ohms so that seemed to be normal. I put the pressure switch module back on to the pump and reinstalled the pump back into the locker. After connecting the wash down hose I applied power and the pump began gushing out water. Ah, fixed I thought. I shut down the power put a nozzle onto the hose and fired up the pump again. I could hear the pump as it pressurized the hose and then shutdown like it should. But after opening the nozzle and relieving the pressure the pump still failed to turn on. So it looks like I'll need to do a little more troubleshooting but, before I do I will get a replacement pressure switch. Since that looks like where the problem is. Though the documentation shows there is not such part. It looks like I may need to order a whole upper housing. I'll be making a call into FloJet customer service to see if this is the case before I continue.
Saturday, January 26, 2008
What I have to deal with

Here is the Westerbeke 27 as it sits in what one mechanic called the tunnel. This is actually the rear of the engine which faces toward the bow of the boat. The V drive transmission is shown at the bottom of the photo. Not a lot of room to work in there so I will remove as much as I can before moving the engine.
 This is the view from the other side of the engine. The front of the engine which faces aft in the Nonsuch.Where is the water pump? On the other side of the alternator and under the exhaust manifold. It was so much fun to change the impeller. Oh how I will miss doing that. What really bugs me though is before I decided to remove the engine I installed a Speed Seal cover on the water pump and never did get to use it since I have decided to replace the engine.
Thursday, December 07, 2006
Lessons learned: The raw water impeller.

Because of it's inaccessible location I decided to...
Subscribe to:
Posts (Atom)


.jpg)
.jpg)


