Showing posts with label SOLAR. Show all posts

Monday, March 22, 2021

A SOLAR UPGRADE

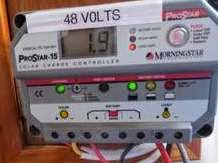
One of the nice things of having converted from Diesel to Electric Propulsion is the ability to easily upgrade. That includes the auxiliary systems.  Like BIANKA's 48 volt solar controller. I originally installed a Morningstar 48 volt solar controller back over ten years ago.

It has been a real workhorse that has never failed to keep the propulsion bank topped up summer and winter. Since that it was installed new solar charge controllers have come on the market. ones with MPPT tracking that claim to squeeze more watts out of the sun along with on board data collection with Bluetooth connectivity. So in late winter I decided to replace the Morningstar unit with a Victron SmartSolar 100/20 48 volt Solar Charge Controller.


Time will tell if the Victron unit will hold up as well as the Morningstar. But, I'm not going to get rid of the old Morningstar 48  volt controller. It has already proved it's self over the years. Instead it will become part of the boat's spares complement. As the prudent mariner always has a backup.


Wednesday, April 22, 2015

EARTH DAY 2015


I am still amazed at how I have been able to reduce my carbon footprint by converting BIANKA to electric propulsion eight years ago. This was further reduced  with demise of the 2 horsepower Honda BF2 outboard because of hurricane Sandy. It is no longer on the boat and is going to the recycler. It's replacement an Electric Paddle is an electric outboard. Both of these upgrades have made things easier on board and also helped keep the boat and earth a little cleaner. In a way everyday is Earth Day on board these days.  

Saturday, November 29, 2014

IN BIANKA'S GALLEY:Zojirushi BB-HAC10 Home Bakery 1-Pound-Loaf Programmable Mini Breadmaker

Adding the 48 volt inverter to BIANKA opens up new choices for items that enhance cruising on board. One of the simple pleasures I enjoy is a nice sandwich for lunch in the cockpit. Though having bread on board can be problematic.  On one hand some of the store bought bread seems to last an unnaturally long time due to the preservatives it is made with. On the other fresh store bought bread does not last that long before it needs to be thrown out. In both  cases the bread eventually gets moldy and requires a trip back to land to replenish the galley with more. That's why I bit the bullet and bought a Zojirushi BB-HAC10 Home Bakery 1-Pound-Loaf Programmable Mini Breadmaker. It is more expensive than some of the larger capacity breadmakers one can buy in the big box stores. But, it's small size really makes it more useful on board a 30 foot boat of this single sailor. So that was a major consideration for me. First let's take a look at what comes with the Zorirushi:


With the Ames 48 volt inverter using the Zoriushi is pretty simple. It's small size allows it to easily fit somewhere on the counter as it makes fresh bread. As shown here on BIANKA's slide out surface over the stove:

It has a much smaller footprint and the built in handle makes it much easier to move into storage than the bigger two pound bread makers. It also has a convenient clip on the back to store the power cord:

The clip helps when putting the unit into a locker for storage.  Now to move on to the bread making test. I first made sure the 48 volt battery bank was fully charged and the XBM battery monitor was reset to 100%:
I

The bread maker comes with a large instruction manual and also a DVD for the various recipes. But, it also has a decal on the side with the procedure and ingredient list for the basic bread recipe: 


This comes in handy as one does not need to always refer to the written manual just to use the basic bread recipe. After adding the ingredients in the order selected I hit the start button. The unit seemed to just sit there for twenty minutes with the words "Rest" on it's LCD screen:

At first I thought this strange. What is really going on is the Zojirushi  is heating up the container and the liquid ingredients to the proper temperature before mixing  them with the dry ingredients. Handy since one does not need to preheat the water like on some of the other bread makers. The unit goes through several cycles in the three hour and 40 minutes it takes to make a one pound loaf of fresh bread. There is the mixing/kneading cycle:

Looking at the amp draw from the 48 volt battery bank shows a 1.9 amp draw:

During the rising cycle there is minimal current as the dough is allowed to rise:

It is during the baking cycle where it has it's highest current draw of about nine and a half amps:


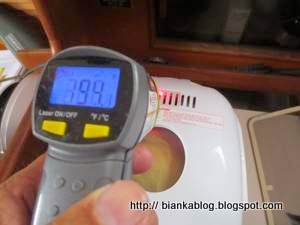
Though this is not constant amp draw but, cycles depending on the heat of the baking chamber. Speaking of heat the top of the unit does get quite warm 196 degrees Fahrenheit when measured directly at the vent:

Though the top of the unit is about 50 degrees cooler. Still it's best to keep inquisitive hands away from the unit during baking. After three hours and forty minutes the bread is finished:


In between the cabin has has been filled with the aroma of fresh baked bread. After it was finished baking the bread I took a look at the XBM battery monitor:


Which shows the loaf used about 2.2% of the battery capacity. Which quite easily made up with the solar panels and/or wind turbine. 

Checking on other parameters the XBM showed the Zojirushi only used 4.6 amp hours from the 48 volt battery bank. A small amount to expend in order to have fresh bread available on board. I have found that a loaf will last me three or four days including having toast in the morning and a sandwich in the afternoon. I am very pleased with the Zojirushi unit.  It also seems to be better built and quieter than the cheaper bread makers. It's compact size makes it ideal for a boat with limited storage space. But, best of all as a sailor who tends to cruise having the ability to make fresh bread also limits the need to head back to shore to re-provision. I can stay in the cockpit enjoying lunch thinking about  the parting words of the late Warren Zevon which were to "enjoy every sandwich".

Thursday, October 09, 2014

HARVEST TIME


I was glad to be on board to once again see the full moon rise over the harbor. It was the Harvest Moon and probably the last one I see before I put the boat on land for the winter. Watching that Harvest Moon I began thinking that BIANKA has been back on the mooring for over two weeks. In that time I have not had to fire up the Honda 2000 eu generator to charge the two battery banks on board. Which is a good thing because as efficient as the Honda is it is still fuelish to use it. Instead BIANKA has be harvesting all the energy it needs from the solar panels and 48 volt Marine Air X wind turbine. So there has been no need to fire up the generator. No doubt the addition of the new 100 watt Renogy solar panel has added enough power to make up for the additional refrigeration I added this year.

Tuesday, September 30, 2014

ANOTHER SOLAR PROJECT: Cockpit Ammeter Junction Box

Temporary cabin meter setup
With the purchase of the new Renogy 100 Watt Solar Panel. I finally got the gumption to get going on another long overdue project. namely moving the Solar Panel Ammeter from inside the cabin where it was temporarily mounted over ten years ago to a more useful cockpit location. Though like many projects my procrastination had the benefit of an improved idea over my original thoughts. For example I had purchased a Cable Connect Waterproof Enclosure Case Junction Box for another project. The measurements were metric and since I think through the dimensions I found the box was too big for my original plans.
 Original Kings LORAN mounted

But,  sipping a beer one day I looked at the space where the original Kings 8001 Loran unit used to reside and found that the waterproof junction box fit very nicely between the still installed Kings mounting bracket. AHA I thought the box would be perfect for the solar panel ammeter moving project. So it began.


 First I decided where on the waterproof box I would mount the ammeter and marked it out:

Then using a hole saw I cut out a hole for the back of the meter to fit through:

It was not quite the right size so out came the trusty Dremel Tool and using a cutting drill I was able to enlarge it slightly to the proper size. Once that was done I carefully removed the front panel of the meter to mark where the mounting holes would need to be drilled to secure the meter:

Once that was done I mounted the meter:


I used Anderson Powerpole connectors for most of the connections behind the panel in the junction box. This will allow for easy trouble shooting or changes in the future should I need to do so:

With the ammeter installed now I could easily see how many amps are heading into the 12 volt house bank and how I can improve on the amount of current by repositioning the movable Renogy 100 watt panel or repositioning the boom:

I also thought up another useful addition to this project that I will post about as soon as some parts arrive to implement it.


Thursday, September 25, 2014

A LOOK AT THE RENOGY 100 WATT BENDABLE SOLAR PANEL

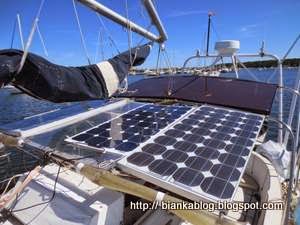
BIANKA was doing well energywise with my homemade solar bimini that contained just two 75 watt Siemens 12 volt solar panels and two 60 watt 48 volt Kanaka panels. But this year I added a second Engel refrigerator/freezer and the 150 watts of 12 volt solar available was having a hard time making it through the night without the Morningstar Solar Controller having flashing red lights appear on it's charge panel in the wee hours threatening to cut off power to the ENGEL coolers. Cleary a little more power would help. Yeah, I could fire up the Honda in the evening to charge things up a little more. But, that would be a little fuelish and something I try to limit doing.  So an additional solar panel seemed like the best solution and something that I was thinking of adding anyway. As I looked at the possible choices of Solar Panels  for installing on BIANKA. I came across the Renogy® 100W Monocrystalline Bendable Solar Panel. This panel looked like it would solve a lot of issues I had about adding a new solar panel to the boat. Namely the weight and where to mount another panel. Since the Renogy panel only weighs four pounds it's light enough to move around. Since it can also bend a little I could easily move it and lay it on the deck in a location to receive the highest energy from the sun. It also claimed a 20% efficiency rating.  It sounded too good to be true but, I bought one to check it out. First take a look at whats in the box:


After unboxing the panel a small sticker on the plastic membrane says to remove it:


The big junction box that was the norm on early solar panels has been replaced by a thin raised piece of plastic with two wires coming out of the ends with MC4 connectors on the ends:


The panel has six small brass grommets situated around the panel so you can secure it or hang it depending on your mounting needs:


The holes are a little small but, I was able tie a bowline through them using some 500 lb paracord:


This will make it easier to secure the panel as I move it around the boat or hang it to use as an occasional solar shade.  The photo below shows the comparison in size of the 100 watt bendable Renogy panel next  to one of the 75 watt Siemens panel on the right:

 The Renogy panel also weighs only about four pounds compared the the Siemens sixteen. This makes it ideal for being able to move around the boat to get maximum exposure on the panel. That's not easily done with the rigid heavy panels like the Siemens and others. Here is an example of moving the panel off of BIANKA'S solar bimini and laying it on the deck for better exposure to the sun:

With a little adjustment of the angle I was able to get some decent amperage out of the panel without too much effort:

5.15 amps is pretty good considering the optimum operating current according to Renogy is 5.70 amps.

NOTE: The panel comes with MC4 waterproof connectors on it's output wire but, you will have to purchase two more MC4 mating connectors and wire them to hook it into your system.

So far I am very impressed with the Renogy panel it bends nicely to the curve of the deck and seems rugged enough to move around without breaking. You might be able to step on it as long as it was fully supported underneath but, I really would not recommend it. It is smaller than the 12 volt 75 watt Siemens panels I installed  back in 2002. This shows the advances that have come along in solar panel technology over past twelve years.  Whether or not the Renogy panel will hold up as well as the Siemens panels is yet to be seen. But, so far I'm very pleased with the purchase and it's operation.

Saturday, September 13, 2014

MORE SOLAR

BIANKA already has a bimini made up of solar panels. Two 75 watt 12 volt panels charge the house bank batteries and two 60 watt 48 volt panels help charge the propulsion bank. The panels have served me well but, this year I added an addition  Engel Marine Fridge Freezer unit and the two 75 watt 12 volt panels could use a little help. I find myself having to fire up the Honda 2000 generator on occasion. Something I did rarely with just one Engel in operation.  so I ordered a  Renogy® 100W Monocrystalline Bendable Solar Panel to add a little more power for solar charging.

I should have it in a few days and will connect it into the 12 solar controller and see how much it helps with the additional load the new ENGEL refrigerator has added. What convinced me to try it  was it's lightweight and the ability to move it around the boat in order to get access to the most sun.   Unlike the panels on the solar bimini which are rigid frame units the new panel has some flexibility that allows it to conform to curved surfaces like the deck. It looks like it will help a lot.  I'll report on how well the new Renogy panel works as soon as it arrives and I get a chance to play with it which should be in a few days.

Monday, August 04, 2014

A SMALL CONNECTOR PROJECT

When I added the 48 volt solar panels to the bimini project I needed a way to connect both the 12 volt panels and 48 volt panels to their appropriate battery banks. So I rigged up a temporary junction box using a barrier strip and a small plastic project box as a temporary install. Here is what I had and it has work pretty good over the years.

 Well several years later I'm getting around to an upgrade . I'm finally getting around to making a better way to connect the solar panels to the solar controllers using Anderson Powerpole connectors. Like the ones shown here:

The blue connector signifies that the voltage the wires are carrying is 48 volts and is used to charge my electric propulsion battery bank. Speaking of colors notice how the red color has faded from this wire:
Exposure over the years has caused it to almost become white in color. Another good reason to have color coded connectors like Powerpoles on the ends of the wires.

 The Anderson Powerpole connectors can also be mated as shown here:

 This assures the proper ground (black connector) travel with the positive voltage wire. This helps to eliminate confusion with different voltage systems. You can also buy an optional clip that locks the pairs of Powerpole connectors to add some extra security that they won't pull apart.

So after replacing the lug connectors with Powerpoles I also put a little dab of Marine Goop on the back of each connector to help seal the wire and connectors.


Now both the 48 volt  and 12 volt solar panel connections can be easily accessed for troubleshooting and testing. I have plans to put some instrumentation in line to measure how well the panels are doing in the near future and I will post about those tests here on the blog.

Wednesday, June 11, 2014

ELECTRIC BOATS ARE FUN

BIANKA is a cruising boat. I never race. But, this electric boat looks like a bit of fun:


Hat tip John Rushworth

Wednesday, March 05, 2014

SOLAR SAILS

When I converted my boat to electric propulsion back in 2008 the idea of having sails that were also solar panels was kind of a pipe dream. Always seemed like a good idea to me with the boats 540 square foot sail and especially since BIANKA used batteries and an electric motor for it's auxiliary propulsion. Well, it looks like this idea is about to come to fruition:

"UK Sailmakers France, innovator of MatriX Titanium sails, has started a new company called SolarClothSystem® that will make mainsails with a film containing high efficiency photovoltaic cells. The cells are flexible enough to be used on sails that get rolled or folded. SolarClothSystem cells are printed on a 65-micron thick film." -UK Sailmakers


"The fine PV film (65 microns, DSSC type) is made ​​in the USA. The integration is carried out in France in Mandelieu-La Napoule (patent pending). Cclls are either embedded in the layers of a new sail membrane type or added on sails, new or not, gluing and sewing on woven materials, Dacron or Spectra kind. The flexible film allows the mainsail to be rolled on the boom. The harvested energy is transported by an integrated via the luff of the sail flexible circuit and then to the foot of the mast. A small electronic controller installed inside the boat controls the battery charging."

Of course the devil will be in the details. but, at least the idea of incorporating solar panels into a boats sails is starting to make it's way onto the waters. This electric sailor will sure be keeping an eye on where it goes from here.

Hat tip: Elecktra Yachts