Showing posts with label RUST. Show all posts

Tuesday, April 04, 2017

SPRING CHECK SURPRISES: The Good and the Bad

A nice 60 degree F day in between rain storms. It has be awhile since I've checked on BIANKA about a month. Since that time we've had a near blizzard and some pretty heavy rains. I don't shrink wrap BIANKA for the winter having found the boat when shrink wrapped develops mildew in spots and generally tends to get grimy and feel humid when shrink wrapped. So I was surprised to see despite the snows and rains of the last month BIANKA's bilge was pretty dry except for the splash of antifreeze I left in it during my last visit:


She's a pretty tight boat. I think I helped make her tighter by taping over the cockpit hatches. This prevents excess water, ice and snow from leaking down below. Probably something I should do every year when storing her for the winter.

I just did a quick check and took some photos of a few things that are on the maintenance list. One of the items is the jammed Maceration pump. I'm not looking forward to working on this item for a number of reasons but, mostly because it's location looks like it is going to be a pain to get access to and remove. While taking some photos of the pump area I noticed that one of the clamps that secures the head intake and wash down hoses was severely rusted:


This is a boat sinking issue and it is moved to the top of the list of Spring Outfitting issues to address.

Sunday, June 22, 2014

CLEANING: Countertop Rust Stains

Finishing up some spring cleaning in the galley. I discovered I had left my cast iron frying pan on the sliding formica countertop over the winter and had some rust embedded into the surface. I first tried my staple cleaner which is some  Simple Green All-Purpose Cleaner. It had limited results. I then tried some CLR Calcium, Lime and Rust Remover soaked onto a paper towel that I left over the stain overnight:

It worked better but, there was still a good sized rust stain on the counter:

I then bought out the  FSR Fiberglass Stain Remover  :

and dabbed it over the stain using a disposable paint brush:

After letting it soak in a bit and using a piece of 3M Scouring pad the rust was completely removed from the countertop:
I wiped down the counter with a damp paper towel and finished the job.
Always good to have several cleaners on board to try and I learned a lesson not to let the cast iron skillet sit on the countertop for any length of time.

Monday, September 17, 2012

RELIABILITY: So much for that!


Reliability can be a double edged sword as I recently found out. I've had a Honda 2000i generator on board for as long as BIANKA has used electric propulsion which is going on five years. It is used for a number of things on board. Because BIANKA no longer has a diesel engine and therefore no alternator the generator comes in useful in assisting the electric windlass in raising the anchor so the 12 volt battery bank is not depleted. It is also useful in charging the 48 volt propulsion bank especially the all important bulk phase for charging before letting the wind and solar take over at anchor or on the mooring. It can also move the boat along nicely at three knots without draining the battery bank as an economical hybrid propulsion system. It also powers some of the 120 volt power tools I sometimes use on board too. For five years the Honda has been a reliable workhorse when needed.

So when I noticed the pull cord was starting to look a little frayed a few weeks ago I bought a replacement. After five years it was to be expected. It was still starting the engine but, I figured it was only a matter of time before I would have to change it. I was about to head out on a two week plus cruise with an extended stay at a dock in New York where I thought I'd replace the pull cord. The boat was fully provisioned up and I motored out to the mooring where I was about use the generator and my electric hookah dive setup to do a quick clean of the hull before catching a favoring current to start the cruise. I grabbed the pull cord and it suddenly broke.

Oh well, I thought no problem I've already got the replacement cord. I had the service manual for the generator which involved taking the covers off and removing the fuel tank to get access to the recoil starter to replace the pull cord. Not too involved I'd just depart a little later than planned or wait until tomorrow. The problem was because the Honda had been so reliable for the past five years I never had any reason to remove the covers before and because it was operating in a marine environment a number of the screws had seized up tightly.


I then spent two days trying to remove them using various methods from PB Blasterscrew extractors  and finally ended up drilling some of them out.


 I also used my Dremel Rotary Tool to  make slots in some of the screws turning some of the phillips head screws into slotted ones:


To make matters worse some of these screws were "special" items according to the service manual. Needless to say I did not start out on that cruise and am currently waiting for parts including some of the "special" screws to arrive.

CAPT. MIKES'S TIP:  If you are using a generator like the Honda 2000 or some other make on board. Take some time when you first get it to coat the cover screws with some of anti corrosion product like Tef-Gel .  It will save a lot of time and aggravation later.  One thing is for sure when I re install the screws each will get a nice coat of Tef-Gel  so in five years when I need to replace the pull cord again it will be a much easier and faster job.


Saturday, July 07, 2012

ANCHORS AWEIGH

"RUST NEVER SLEEPS"


When I bought BIANKA in 1995 it had one hundred feet of chain of 3/8" connected to 140 feet of pliant braid on board and a 33 lb Bruce anchor. It has worked well over the years for me in all kinds of conditions. Including a brush with a catagory one hurricane Earl in eastern Long Island. I notice it starting to rust over the years but, the rust got knocked off with the first time I anchored each season. At least that part that entered the water. I rarely had to put out more than 75 feet of chain when anchoring. Which meant the remainder of the chain sat in the damp chain locker rusting away. I had a "yikes"moment last year when I saw some of this severely rusted chain go over the anchor roller. I thought it is about time I got some new anchor chain as after twenty six years BIANKA's original anchor chain really did not owe me anything.

I had a hard time trying to figure out what size chain to order. I was pretty sure it was 3/8" chain but, the chain was so rusted I had a hard time figuring out what size it really was by measuring it as this photo comparing the new chain to the old shows:

These two chains were originally the same size but, rust has severely reduced the size of the original chain on the bottom. Just to be sure I would buy the correct chain I ordered a one foot sample of 3/8" anchor chain for ten dollars. I don't want to make a mistake in ordering almost a thousand dollars worth of chain weighing several hundred pounds as the shipping is expensive. I originally thought I had 125 feet of chain on board but, it really was only 100 feet. But, I ordered 200 feet of new chain so I would be able to put out  more scope when anchoring in the future with the chain. I ended up with a half barrel (200 feet) of chain being delivered. I bought it from 1st Chain Supply which had a pretty good price including delivery for 3/8" ACCO BBB galvanized chain.
Now it was time to remove the old chain. Since the boat was still in the boatyard I removed the Bruce anchor and used the windlass to drop the chain to the ground:

and onto a piece of scrap shrink wrap to make sure I would not be picking up a lot of dirt when I picked the chain up:

 Once the chain was off the boat I then removed the pliant braided anchor line from the chain locker. What remained inside the chain locker was about 5 pounds of rusted anchor chain:
I vacuumed the rust up and cleaned out the anchor locker.  I then took the rust covered pliant line that had been sitting under the chain for the past sixteen years to a laundromat put it into a machine with some Woolite :


After it was washed I bought it back to the boat and using my Forespar Nova Lift and hoisted the line up in a large duffle bag:

I then laid the line out over the deck for two or three days to dry out before putting it back into the chain locker  and attaching the new chain to it. After I attached the chain to the line I marked the chain with a bunch of red cable ties to let me know when deploying the chain that I am reaching the end of the chain. I marked it about 15 feet from the end:

I will eventually mark the chain with both paint and cable ties at various points along the chain 25, 50, 75, 100 etc... so I will  know how much has been let out. But, for now cable ties will do. I was a little concerned that perhaps 200 feet of chain might make the boat a little bow heavy but, happily that is not the case. The best thing is I can now sleep better at anchor knowing that BIANKA rides on some brand new anchor chain.


Sunday, May 30, 2010

DANGEROUS SURPRISES ON BOARD

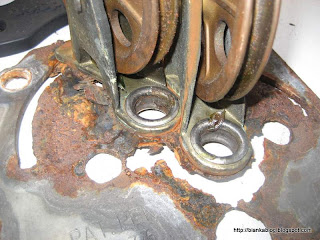
I think there are three levels of dangerous surprises on a boat. They are YIKES!, UH-OH and WHAT THE (insert your expletive here).  Of the three the "What the..." is the most serious and surprising because it happens without warning. Like when you are sailing along and the mast falls over the side. Second in seriousness is the "Uh-Oh" when you discover something is a miss but, you still might have time to correct things and prevent disaster. This happens quite often when sailing. For example when you notice that the boat is about to jibe but, you still have time to prevent it and possibly avoid ripping the sail.  The last level of danger is the "Yikes" moment. This is when you catch something before it could do serious damage but, you also realize how close you would have been to a "What the..."  situation had you not found it. I had a serious YIKES moment back when I was installing the electric propulsion system on BIANKA several years ago.  I spent a lot of time below the cockpit when pulling the engine out and installing the electric propulsion system. I noticed a few flakes of rust under the engine and thought they came off the engine. Since I was pulling the engine out I was not concerned. After the engine was out and I had installed the electric propulsion system I still noticed that there were still flakes of rust gathering in the area where the engine was.  Then I looked  up and had my YIKES moment:
What you are looking at above is the rusted Edson steering idler plate assembly. It routes the steering cables from the Edson pedestal to the rudder post so you can steer the boat. A pretty important function. As you can see this plate was living on borrowed time. It is often overlooked on board because one has to squeeze down and look up to see it. Usually when one is down below the concentration is on some engine maintenance issue and not looking up overhead.  It looks like over the years water leaked down on to the metal plate and slowly rusted it. Because it was out of sight it was easily over looked.  This definitely need to be replaced ASAP!  Below is a photo of all the rust that fell off of this plate as I removed it.

Definitely not a pretty picture.  Even worse is what the Edson plate looked like after I removed it as shown below:


As you can see this was bound to fail very soon. Which is what made it a YIKES discovery. I still shudder when I think what might have happened had the idler plate come apart when under sail. Happily Edson has come up with a a new and improved design and is not using steel for this part now a days. I'll show you what did to replaced this rusted piece technology in an upcoming post.